
In the last part we have looked at the integration of the vSphere CSI in to a Rancher cluster in order to create PVCs directly on your vSphere datastore.
There are other Kubernetes resources by VMware that can be used aswell, such as the Antrea CNI (Container Network Interface). By default, Rancher comes with Calico as a CNI but every CNI is compatible, you just have to manually install it.
The benefit of doing this is that with the Antrea CNI you can fully integrate your cluster into NSX and vDefend. This means that you will see your cluster, namespaces and even pods in the NSX inventory and can create DFW rules for pods. This means micro segmentation in NSX on a pod level!
Creating the cluster
First things first, you can not do this in an existing cluster (while it theoretically might be done, exchanging the CNI is not something that is easily done) and you should create a new cluster with the Antrea CNI already in place. Also, we will install the vSphere CSI and CPI while creating the cluster directly. So just do what you did with the last cluster you created until you reach the node settings. There are a few things you have to concider here.
First: Antrea requires a minimum node size of 4vCPU and 4GB RAM so size your nodes accordingly.
Second: in the Container Network selection box you have to select "none" as the Antrea installation is done via a YAML file.
Also, you want to configure the cloud provider as vSphere in order to directly install the CSI when creating the cluster like so:
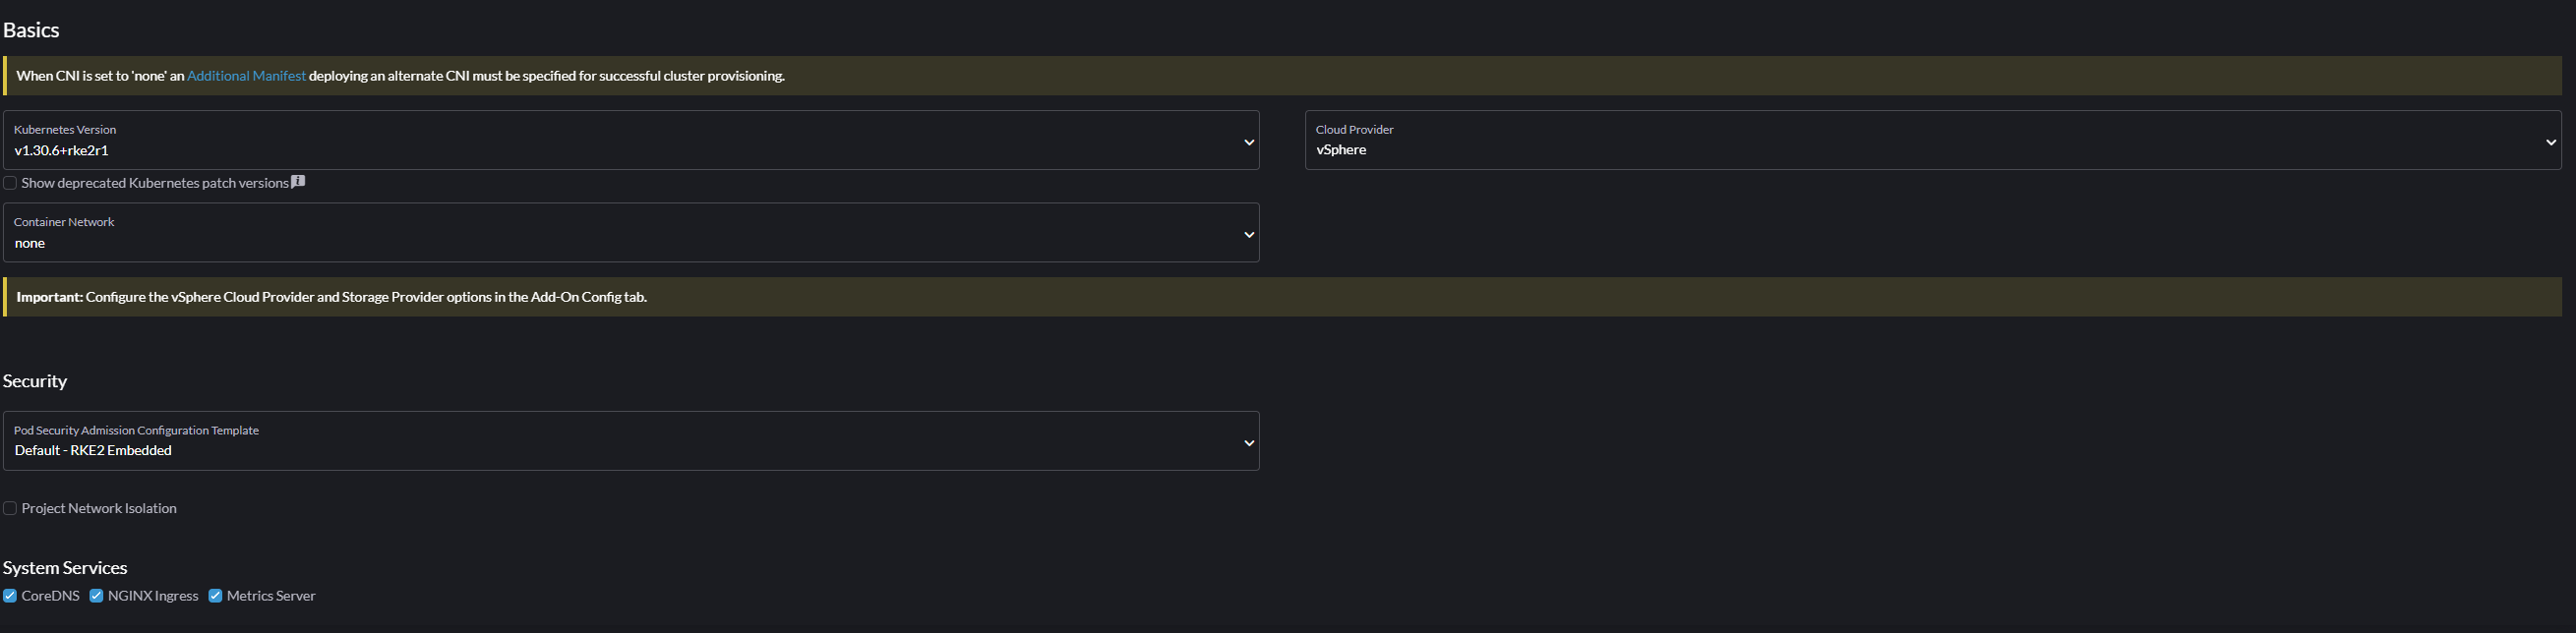
As you can see from the yellow warnings, you need to configure the CNI and the vSphere Cloud Provider. First go to the "Add-On Config" tab on the left. Here you need to fill out the vSphere settings the same way as you would have done in Part3 of this series to install the CSI.
You will notice a small field at the bottom of this form called "Additional Manifest". This is where you need to paste the YAML file for Antrea. I will take the latest version so go to https://raw.githubusercontent.com/antrea-io/antrea/main/build/yamls/antrea.yml and copy the whole content of this file and paste it into the "Additional Manifest" field.
Adjust any other configuration you might want to change but this is all that is needed for the moment so you can click on create and wait a few minutes until the cluster starts up.
Verifying install
After the cluster is up, verify that everything is running properly by accessing the cluster. You can either do this in the Rancher-WebUI or copy the Kubeconfig to any workstation with kubectl installed. At this point you should do it on a Linux workstation (or VM) because you will need one in the next step anyway.
Run the following comands to verify everything working properly for the moment:
kubectl get pods -n kube-system | grep antrea
antrea-agent-8kbxz                                          2/2     Running     0               7m25s
antrea-agent-ps56w                                          2/2     Running     0               3m54s
antrea-agent-qkw22                                          2/2     Running     0               3m31s
antrea-controller-5dc575d4-x9kdm                            1/1     Running     0               7m25s
etcd-rks-blog-antrea-pool1-ncfkd-4fw99                      1/1     Running     0               2m58s
etcd-rks-blog-antrea-pool1-ncfkd-4h5np                      1/1     Running     0               7m16s
etcd-rks-blog-antrea-pool1-ncfkd-pc7q8                      1/1     Running     0               3m8s
kube-apiserver-rks-blog-antrea-pool1-ncfkd-4fw99            1/1     Running     0               2m41s
kube-apiserver-rks-blog-antrea-pool1-ncfkd-4h5np            1/1     Running     0               7m36s
kube-apiserver-rks-blog-antrea-pool1-ncfkd-pc7q8            1/1     Running     0               3m36s
kube-controller-manager-rks-blog-antrea-pool1-ncfkd-4fw99   1/1     Running     0               3m9s
kube-controller-manager-rks-blog-antrea-pool1-ncfkd-4h5np   1/1     Running     0               7m30s
kube-controller-manager-rks-blog-antrea-pool1-ncfkd-pc7q8   1/1     Running     0               3m38s
kube-proxy-rks-blog-antrea-pool1-ncfkd-4fw99                1/1     Running     0               2m56s
kube-proxy-rks-blog-antrea-pool1-ncfkd-4h5np                1/1     Running     0               7m36s
kube-proxy-rks-blog-antrea-pool1-ncfkd-pc7q8                1/1     Running     0               3m14s
kube-scheduler-rks-blog-antrea-pool1-ncfkd-4fw99            1/1     Running     0               3m9s
kube-scheduler-rks-blog-antrea-pool1-ncfkd-4h5np            1/1     Running     0               7m30s
kube-scheduler-rks-blog-antrea-pool1-ncfkd-pc7q8            1/1     Running     0               3m38s
Here we can see that all the antrea pods are up and running. Do the same for the CPI and CSI pods:
kubectl get pods -n kube-system | grep vsphere
helm-install-rancher-vsphere-cpi-glt2j                      0/1     Completed   0               8m39s
helm-install-rancher-vsphere-csi-wprfl                      0/1     Completed   0               8m39s
rancher-vsphere-cpi-cloud-controller-manager-jfv68          1/1     Running     0               8m28s
rancher-vsphere-cpi-cloud-controller-manager-jjmbm          1/1     Running     0               5m
rancher-vsphere-cpi-cloud-controller-manager-vv4dm          1/1     Running     0               4m41s
vsphere-csi-controller-7dc7858ffc-g9ml6                     5/5     Running     0               8m26s
vsphere-csi-controller-7dc7858ffc-gk5fj                     5/5     Running     0               8m26s
vsphere-csi-controller-7dc7858ffc-hcrm5                     5/5     Running     0               8m26s
vsphere-csi-node-5xtsm                                      3/3     Running     2 (7m42s ago)   8m17s
vsphere-csi-node-g26nt                                      3/3     Running     0               3m59s
vsphere-csi-node-vf627                                      3/3     Running     0               4m30s
Looking good, if any pods here are not running or in a crashed state you need to investigate the problem or try to recreate the cluster and check that all the settings you specified are correct.
Get the Antrea Interworking YAML files
Now you need to download the Antrea Interworking YAML files. As these are made and maintained by VMware, you unfortunately can not download them directly. But, as you need to have NSX anyway for them to work, you probably have an account with Broadcom anyway. The file you're looking for is located under Downloads -> VMware Antra -> antrea-interworking-x.x.x.zip (replace x.x.x with the newest Version you want). If you can't see it, you might need to do a NFR or Trial entitlement for this or of course a valid license if you're deploying this in production. But to my knowledge, if you have a valid VCF subscription, which you need anyway for NSX, this should be included.
Download the file and extract it on your workstation that you use to access the cluster. You should see some YAML files and a bin/ directory. In this directory you'll find a .tar.gz archive which you'll also need to extract.
Inside of this there is a appliaction called "antreansxctl" which we'll need to run in order to get the cluster registered to NSX. If you want to know all the options you can run the help with ./antreansxctl --help to get all the commands. But the one we need is bootstrap with the following syntax:
./antreansxctl bootstrap --cluster-name rks-blog-antrea --nsx-managers 10.24.0.50 --user admin --password 'VMware1!VMware1!'Obviously replace the cluster-name, the nsx-manager IP and the admin password for your environment. You will see a similar output to this if everything was successful:
Bootstrapping, User:admin, ClusterName:rks-blog-antrea
I1209 16:38:37.813946  133127 cluster.go:278] Configure NSX client for manager IP 10.24.0.50
I1209 16:38:37.914128  133127 cluster.go:132] Selected endpoint index: 0, ip: 10.24.0.50
Checked PrincipalIdentities in NSX, clusterName: rks-blog-antrea, isExist: false
Creating self signed cert, clusterName: rks-blog-antrea
Created cert rks-blog-antrea.crt
Created key rks-blog-antrea.key
vpc argument is empty, creating enterprise admin PI
Creating principal identity, ClusterName: rks-blog-antrea
Created principal identity, ClusterName: rks-blog-antrea, vpcPath: , key: rks-blog-antrea.key, cert: rks-blog-antrea.crt, PrincipalIdentity: {Links:[] Schema: Self:<nil> Revision:0 CreateTime:1733758722924 CreateUser:admin LastModifiedTime:1733758722924 LastModifiedUser:admin SystemOwned:false Description: DisplayName:rks-blog-antrea@rks-blog-antrea Id:05050acf-a295-43ff-aa99-2f3b4bf43e3f ResourceType:PrincipalIdentity Tags:[] CertificateId:d9eba5de-2c0d-4fee-babd-265d5fd0e2e3 IsProtected:true Name:rks-blog-antrea NodeId:rks-blog-antrea PermissionGroup:}
role: enterprise_admin on /
Created bootstrap Configmap and Secret yaml file, bootstrapYamlFile: rks-blog-antrea-bootstrap-config.yaml
This means the following was created:
- rks-blog-antrea.crt: certificate to authenticate cluster to NSX Manager
- rks-blog-antrea.key: Private key for the above certificate
- enterprise admin PI: Principal Identity user in NSX that is used to authenticate the cluster in NSX Manager
- rks-blog-antrea-bootstrap-config.yaml: bootstrap YAML file that includes the secret, configmap and namespace information for the integration
If you have all those files, you can apply the yaml files to your cluster. The first file you need to apply is the just created bootstrap yaml file:
kubectl apply -f rks-blog-antrea-bootstrap-config.yaml
namespace/vmware-system-antrea created
configmap/bootstrap-config created
secret/nsx-cert created
After that the interworking.yaml file found in the extracted directory:
kubectl apply -f interworking.yaml
namespace/vmware-system-antrea unchanged
customresourcedefinition.apiextensions.k8s.io/antreaccpadapterinfos.clusterinformation.antrea-interworking.tanzu.vmware.com created
customresourcedefinition.apiextensions.k8s.io/antreampadapterinfos.clusterinformation.antrea-interworking.tanzu.vmware.com created
serviceaccount/interworking created
serviceaccount/register created
role.rbac.authorization.k8s.io/vmware-system-antrea-register created
role.rbac.authorization.k8s.io/register created
clusterrole.rbac.authorization.k8s.io/antrea-interworking created
clusterrole.rbac.authorization.k8s.io/antrea-interworking-supportbundle created
rolebinding.rbac.authorization.k8s.io/vmware-system-antrea-register created
rolebinding.rbac.authorization.k8s.io/register created
clusterrolebinding.rbac.authorization.k8s.io/antrea-interworking created
clusterrolebinding.rbac.authorization.k8s.io/antrea-interworking-supportbundle created
configmap/antrea-interworking-config created
configmap/cluster-id created
deployment.apps/interworking created
deployment.apps/register created
To see if it worked run the command and check if all the pods are up and running:
kubectl -n vmware-system-antrea get all
NAME                                READY   STATUS    RESTARTS   AGE
pod/interworking-86bbf7b6fc-f6n54   4/4     Running   0          79s
pod/register-9f9c684cd-ktzlr        1/1     Running   0          79s

NAME                           READY   UP-TO-DATE   AVAILABLE   AGE
deployment.apps/interworking   1/1     1            1           80s
deployment.apps/register       1/1     1            1           80s

NAME                                      DESIRED   CURRENT   READY   AGE
replicaset.apps/interworking-86bbf7b6fc   1         1         1       80s
replicaset.apps/register-9f9c684cd        1         1         1       80s
Looking good!
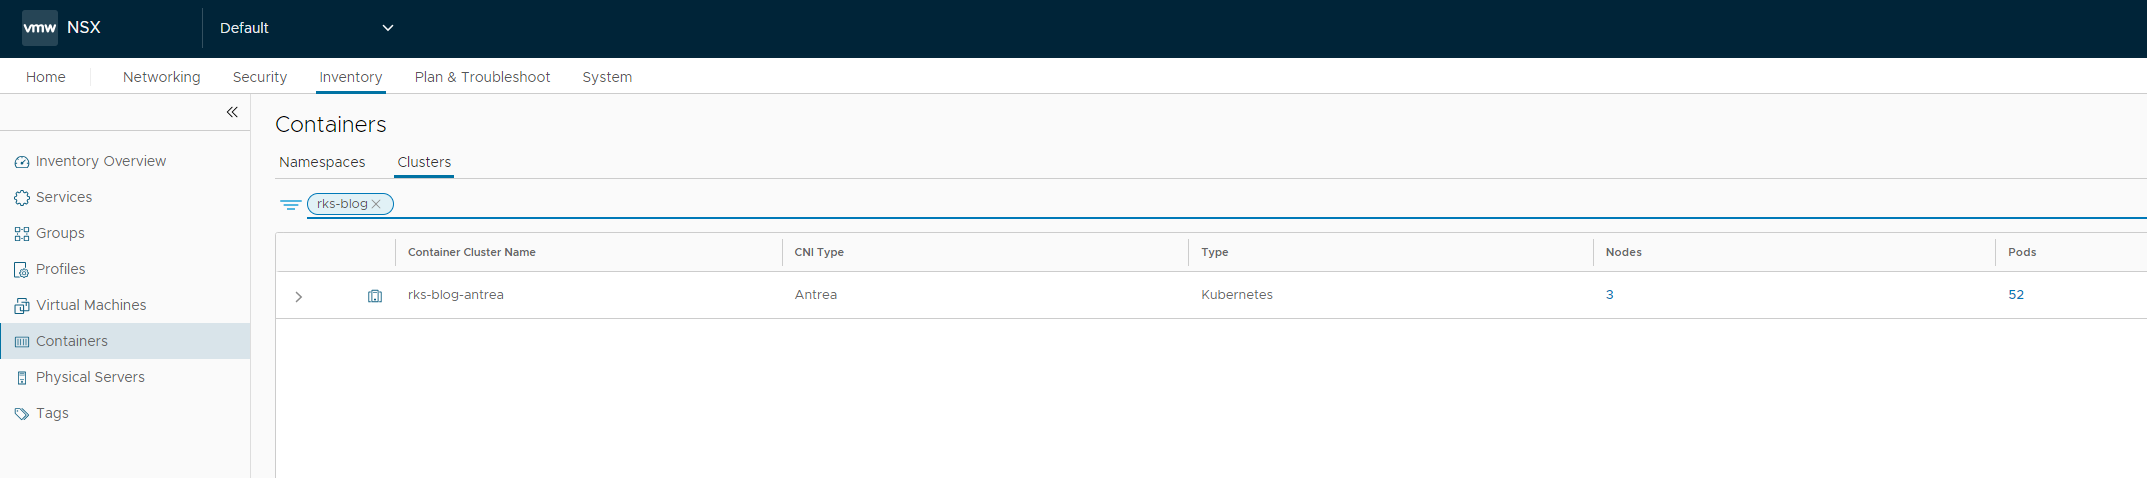
Last step is to verify in the NSX GUI if you can see the cluster, to check if it has registered correctly: Go to Inventory -> Containers -> Clusters to see if everything shows up correctly:
Next steps
Now that you have successfuly integrated your Cluster with NSX, we can leverage the functionality of vDefend in it. For example, if you go to Security -> Distributed Firewall you can create a policy and associated rules directly on your cluster. Then you can create security groups with specific namespaces or even pods and therefore micro-segment your services within the cluster. If you still don't believe me, here is an easy example:
I created two namespaces, antrea1 and antrea2, and deployed a small alpine linux in each of them:
kubectl get pods -n antrea1
NAME     READY   STATUS    RESTARTS   AGE
alpine   1/1     Running   0          6s

kubectl get pods -n antrea2
NAME     READY   STATUS    RESTARTS   AGE
alpine   1/1     Running   0          6s
I now I execute a shell directly in these containers and ping each other:
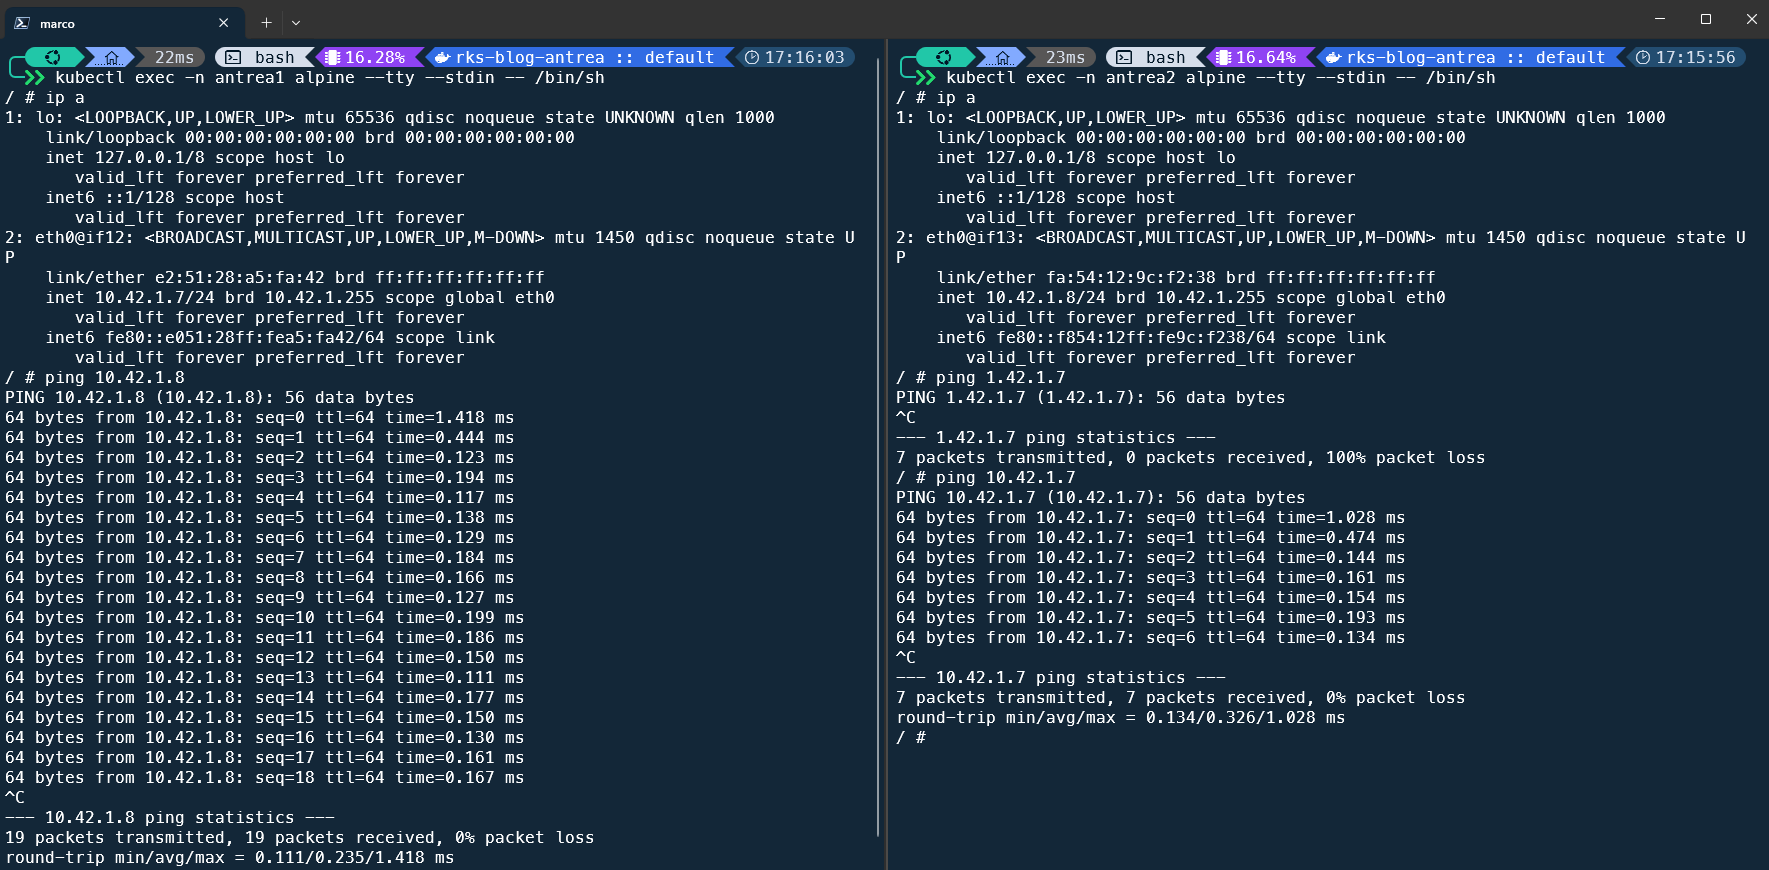
As you can see, the ping works. Now I create a DFW rule in NSX to restrict the traffic from namespace antrea1 to antrea2:

And run the ping again:
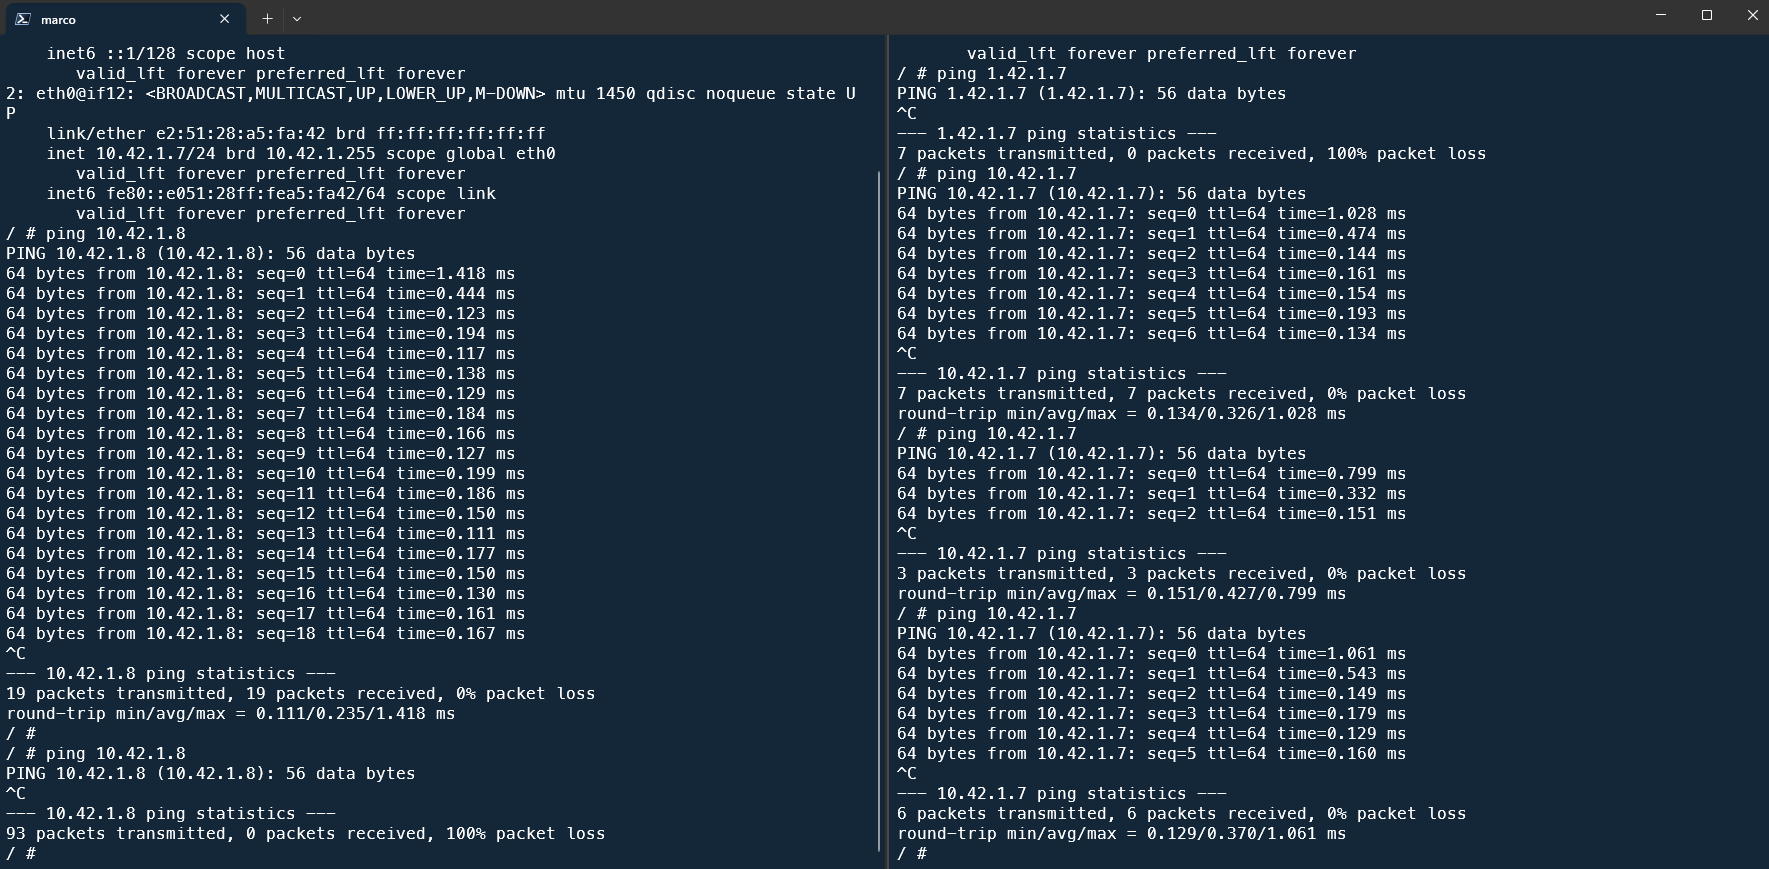
And as you can see, the ping from antrea1 to antrea2 is now resulting in a packet loss, while the other direction still works.
You can create DFW rules now based on pods, services or like I just did, namespaces.