

In the last part of this series I showed you how to install Rancher on docker in a new Linux VM (or physical machine but that defeats the point a bit).
First login
Now that you have installed this, you should be able to connect to the IP of the VM you just installed and get something similar to this:

Follow the instructions for the "docker run" installation and you will be asked about your password. Chose either option but obviously remember what you set.
In the lower part you can set your URL for the Rancher installation. If you set a DNS entry for your Rancher enter this here. If not, just leave the IP, accept the user agreement and continue.
You will be greeted with the cluster overview page. Maybe somewhat surprising, there will already be a cluster here, looking like this:

The reason for this is, that Rancher today only really runs on Kubernetes. It needs a cluster to run all the management, helm controller, internal name resolution etc and these all run in pods. So this is essentially just a KIND (Kubernetes in Docker) implementation.
vSphere configuration
But we shouldn't care or look at the "local" cluster too much, because we won't really be touching it. What we want to be doing is create another new cluster on vSphere. So on the homepage click on "create" and then select "Cloud Credentials" on the left menu. In Rancher you can deploy clusters in a selction of different "Clouds" where the Node VMs will be running. Select VMware vSphere and fill it out something like this:

Note here, that you can fill in a standalone ESXi host or a vCenter, however the ESXi host needs to be licensed either normally or with the evaluation license, as the (no longer available) free license won't work.
As username you can use the standard "Administrator@vsphere.local" user, or create a dedicated service account for Rancher. I opted to do that. This service account (can be local or even AD-joined) needs the following permissions as stated here: https://ranchermanager.docs.rancher.com/how-to-guides/new-user-guides/launch-kubernetes-with-rancher/use-new-nodes-in-an-infra-provider/vsphere/create-credentials
|
Privilege Group |
Operations |
|
Cns Privileges |
Searchable |
|
Content library |
Read
Storage |
|
Cryptographic operations |
Direct Access |
|
Datastore |
AllocateSpace |
|
Global |
Set custom attribute |
|
Network |
Assign |
|
Resource |
AssignVMToPool |
|
Virtual Machine |
Config
(All) |
|
vSphere Tagging |
Assign or
Unassign vSphere Tag |
You also need to make sure, that the Rancher VM can reach the vCenter on port 443, so if there is any firewall you need to open this port.
Create the node template
In order to create a cluster, you need to have a template for a VM in your vSphere inventory. This needs to be either Windows or Linux but I will only focus on Linux here because I never had the need for Windows workers in any Kubernetes environment. So again, pick any compatible Linux distro of your liking. In theory, any distribution is compatible as long as you can install the following dependencies:
- curl
- wget
- git
- net-tools
- unzip
- apparmor-parser
- ca-certificates
- cloud-init
- cloud-guest-utils
- cloud-image-utils
- growpart
- cloud-initramfs-growroot
- open-iscsi
- openssh-server
- open-vm-tools
You can either install these on a fresh Linux install and then make a template out of the machine, or use the provided cloud image by Ubuntu. I tried it with the following image from here: https://cloud-images.ubuntu.com/
Download the 24.04 LTS Noble image. Get the one from the current folder, as this has already updated drivers and tools included. Pick the one called noble-server-cloudimg-amd64.ova and deploy it on your vCenter but don't turn it on. Just leave all the settings in the OVA Deploy wizard as default as Rancher will change them later to what you configure in your cluster.
After the VM has been deployed simply right-click it and convert it to a template.
Create the cluster
After you created your template, you can use this to create a cluster. Click again on the Rancher Homepage on "Create" and fill out everything according to your likings. My example is here with explanations:
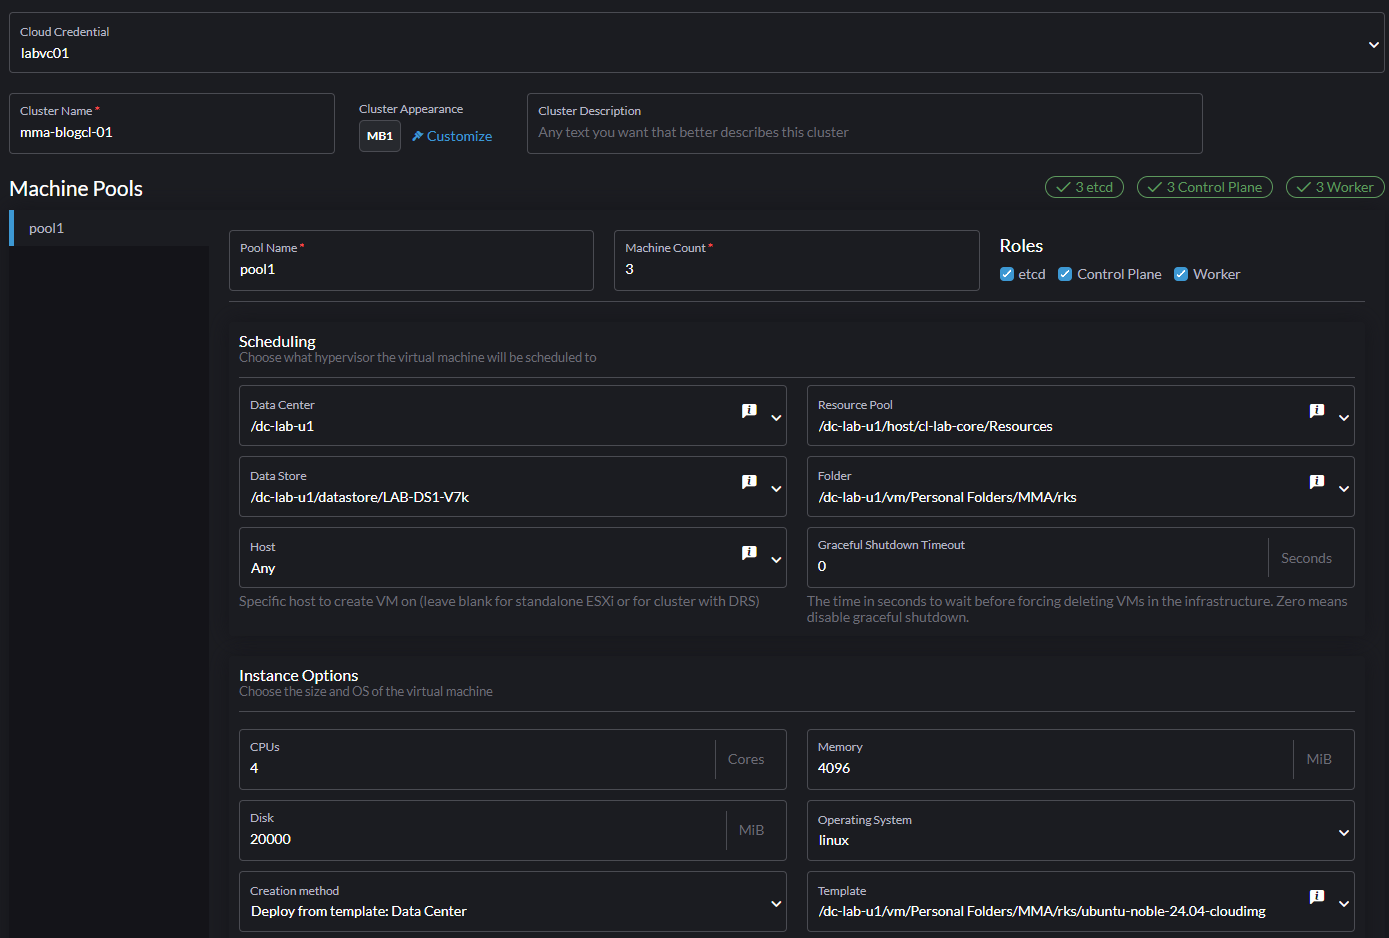
- Cloud Credentials: The vSphere Connection we made in the previous step
- Cluster Name: How your cluster is called. This is also prepended in the VM Name in vSphere
- Pool Name: You can create more than one pool. It is also part of the VM Name in vSphere
- Machine Count: How many VMs are created. If you want high availability you need at least 3. With Rancher you can put Control Plane, etcd and worker on the same machine or separate it.
- Scheduling: All the settings here are important for placement of the VMs. Just put your values in here. The most important settings here are Data Store and Host.
- Instance Options: Here you actually size your nodes. Most things should be self explanatory. Leave Creation method on the default, unless you moved your template to a Content Library and select the Template you made in the previous step.
Click on add network and add the network you want the machines to be in. As stated before, it is important at this step, that the network you select has a DHCP server, as otherwise the nodes will not get an IP address.
Leave the rest as default, we will go over those options at a later stage, but for just a first test those are fine, just a note on the settings below:
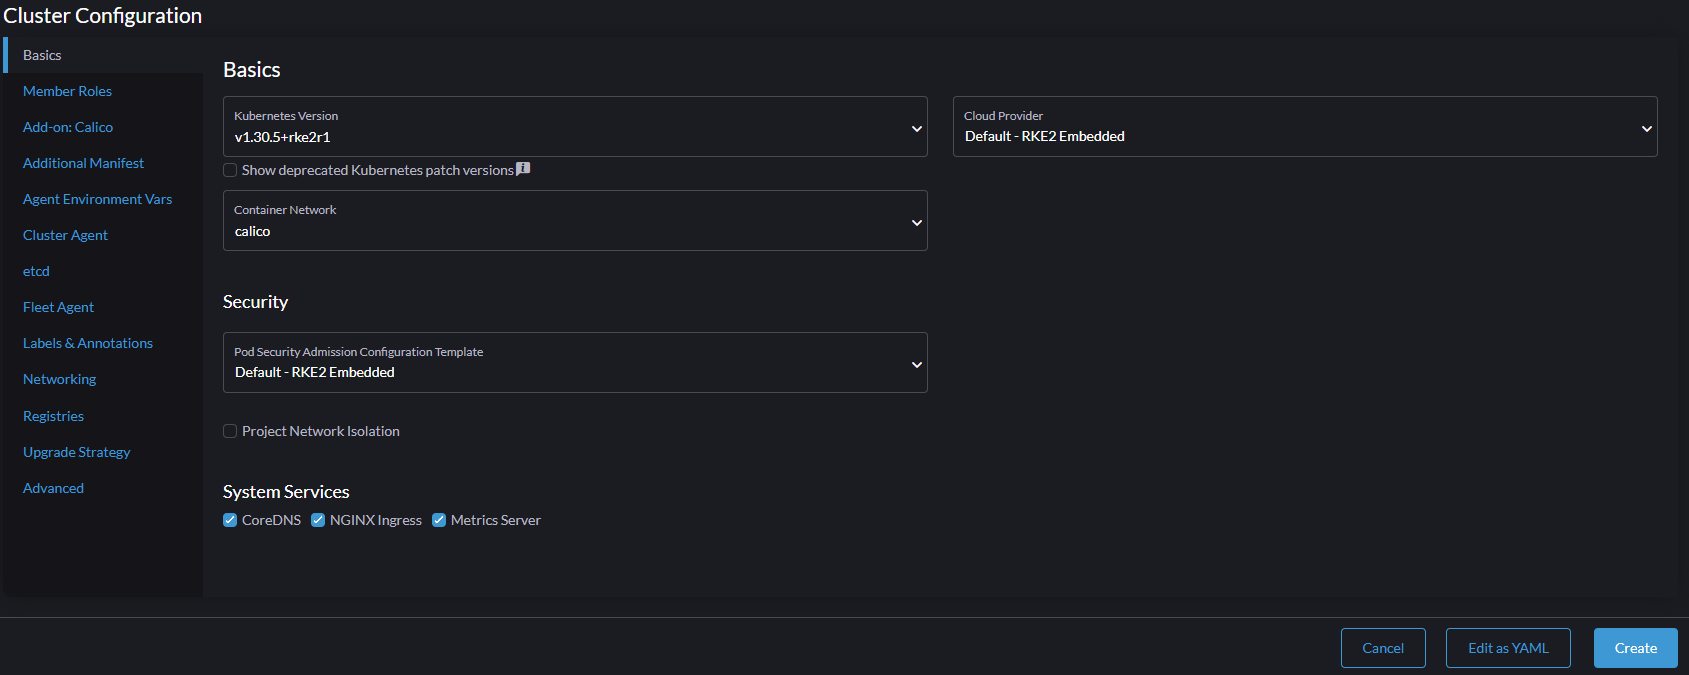
You can chose the Kubernetes version here and whether to use RKE2 or K3S (more on that also in a later post). Also the "Cloud Provider" option here is a bit misleading. It is the option for the storage provider, meaning where your PVs will be created. Eventually we will use the vSphere CSI here but for now leave it on default as that requires some additional configuration and we can change this later. Also calico is fine for now and make sure to leave all the system services enabled so we don't have to do that later.
Click on Create and watch, as your vCenter starts to clone your template into new VMs for the cluster.

If nothing happens after a few minutes, check your connection to the vCenter in Rancher: Check if your service account has the correct permission and if you specified the correct hostname, port and password for the vCenter.
After all the VMs have been deployed Rancher will install every requirement on the nodes. To do this it uses the VMware tools: if you examine the VMs now you will notice that 2 ISOs are mounted on the VMs. Everything needed is on there as well as an SSH certificate and connection info that Rancher uses to connect to the nodes. This is why we didn't need to set a password or any network setting in the template, as everything is handled through this.
During the installation you will see in Rancher the cluster going through several status changes, such as creating the machines, configuring one bootstrap machine with all the dependencies and then joining that to the cluster. After that it will prepare the other nodes from the bootstrap node.
This step might take a while so grab yourself a coffee and afterwards hopefully your cluster is ready. If you see active next to it, it is ready. Click on it to explore more. You will then see more information about the nodes and their respective status.
Accessing the cluster
Now you need a way to access that cluster you just created. For that, click the blue "Explore" button in the top right. You now see all the information about your cluster you might want, such as capacity for CPU and memory, all the running pods and services and much more. For now though access the cluster. On the top right again you have several options.

Click the one highlighted in red here to open a shell with access to the cluster. Alternatively you can download a kubeconfig file here but that's for later. Now just run a simple command to verify the cluster is running:
> kubectl get nodes
NAME                             STATUS   ROLES                              AGE     VERSION
mma-blogcl01-pool1-mqkv5-8cbwg   Ready    control-plane,etcd,master,worker   15m     v1.30.5+rke2r1
mma-blogcl01-pool1-mqkv5-hbnhv   Ready    control-plane,etcd,master,worker   8m44s   v1.30.5+rke2r1
mma-blogcl01-pool1-mqkv5-jc8pz   Ready    control-plane,etcd,master,worker   9m30s   v1.30.5+rke2r1
As you can see from that, I have 3 nodes, each with all the roles and all of them in a Ready state.
So now I have setup a Kubernetes cluster in Rancher on vSphere. In the next part I'll setup the vSphere CSI for persistent volumes and go over some more stuff that can be done with Rancher.